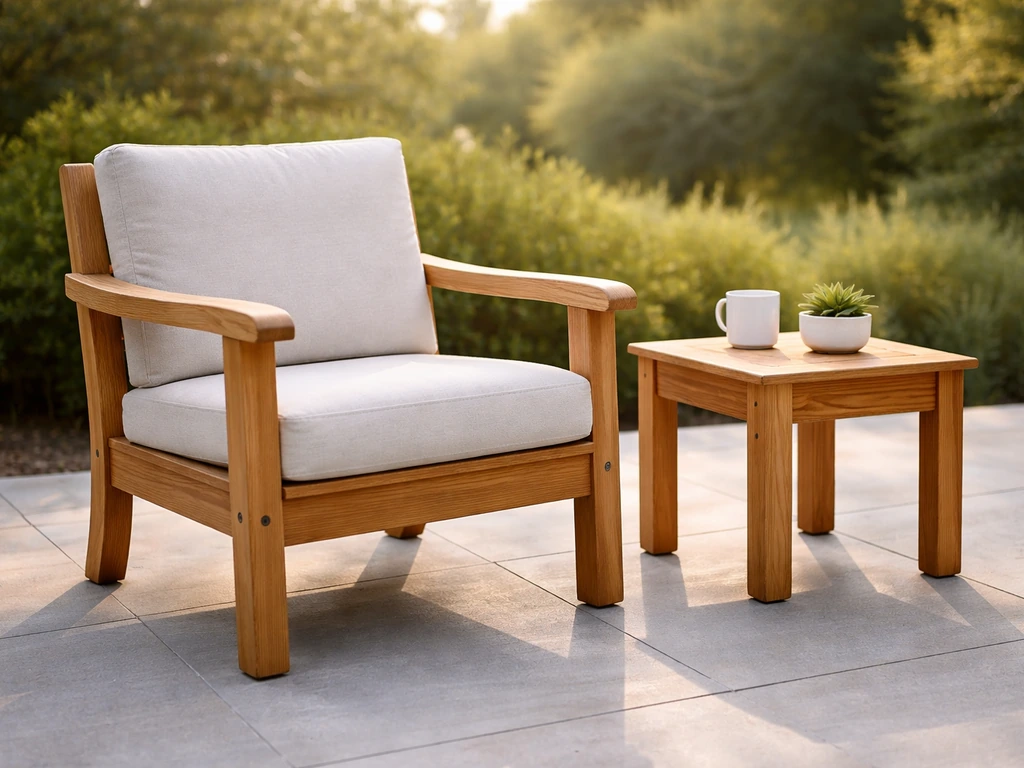
You can repair most quality patio furniture yourself if you correctly identify the material, understand the actual failure, and use the right products for each. Wood and teak need sanding, brightening, and oil or sealant. Aluminum needs cleaning, primer, and paint. Cast iron needs rust removal and a rust-inhibiting topcoat. Wicker and rattan need re-weaving or targeted resin patching. Sling chairs need new fabric and correct spline sizing. Structural cracks, bent frames, and broken welds are the main reasons to call a pro or walk away from the piece entirely. Everything else is fixable at home with a weekend and the right supplies.
Quality Interiors and Patio Furniture Repair Guide
Marcus Kellerman
16 May 2026

Identify the material and the exact damage first
Before you buy a single product or pick up sandpaper, figure out exactly what you are working with. A lot of wasted repair attempts happen because someone treats aluminum like steel, or confuses resin wicker with natural rattan, or assumes all wood furniture takes the same finish. Spend ten minutes here and save hours later.
Material identification
- Teak: dense, golden-brown to silver-gray (if weathered), extremely heavy for its size, tight grain, naturally oily feel even when dry
- Other hardwoods (eucalyptus, acacia, shorea): similar look to teak but slightly lighter weight, more open grain, dries out faster without treatment
- Aluminum: lightweight, will not rust (though it can oxidize and pit), hollow tubing usually, may have powder-coat or painted finish
- Cast iron: very heavy, solid (not hollow), can rust through if the finish fails, often found on vintage or antique pieces
- Wrought iron: similar to cast iron but slightly lighter and hand-forged rather than cast in a mold; also rusts
- Steel: magnetic (cast iron and wrought iron are also magnetic, but aluminum is not), can rust aggressively if powder coat chips
- Natural rattan or wicker: organic plant material, will feel slightly rough or fibrous, can crack and splinter, sensitive to moisture
- Resin/synthetic wicker: smooth plastic strands woven over a metal frame, flexible, does not splinter, common on newer patio sets
Damage diagnosis
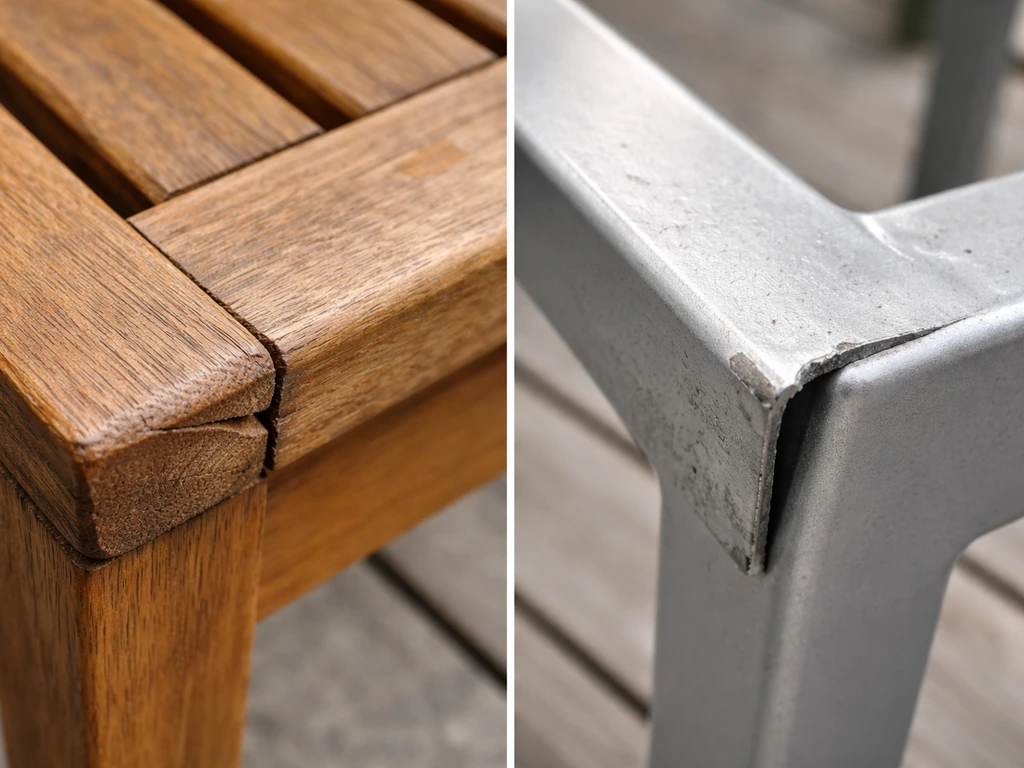
Look at the piece in bright light and run your hands over the frame, joints, and finish. What you find determines your repair path. Surface damage (fading, staining, chipped paint, minor scratches) is almost always fixable. Structural damage (bent frames, cracked welds, rotted wood cores, broken joints) needs more thought about whether repair is realistic.
| Damage Type | What It Looks Like | Severity |
|---|---|---|
| Surface rust | Orange or brown staining on metal, may flake slightly | Low to moderate |
| Deep rust/pitting | Metal surface pitted, feels rough or hollow in spots | High |
| Faded/peeling paint or powder coat | Color loss, bubbling, or chips | Low to moderate |
| Cracked or splintered wood | Visible splits along grain, rough edges | Moderate |
| Rotted wood | Soft, spongy, or crumbling wood core | High (often replace) |
| Loose joints | Wobble at connection points, creaking under load | Moderate |
| Broken weld | Visible gap or crack at a metal joint | High (needs pro weld or replacement) |
| Frayed or torn sling fabric | Holes, tears, sagging, UV brittleness | Moderate (replace fabric) |
| Broken wicker/rattan strands | Missing or snapped strands in weave pattern | Low to moderate |
Quick triage: safety checks and what to stop using right now
Some damage is cosmetic. Some damage is a safety issue. You need to sort these out before anyone sits in or leans on the furniture again. This is especially important with older or vintage pieces, including wrought iron designs that may have hidden rust inside hollow structural members.
- Sit test: sit in or press firmly on the piece and feel for any flex, crack sounds, or movement that should not be there. Do not keep using anything that moves at a structural joint.
- Check all four legs: rock the piece front to back and side to side. Wobble at the feet is usually a leveling issue. Wobble at the seat frame or backrest means a joint is failing.
- Inspect welds on metal frames: look closely at every joint. A cracked or broken weld on a chair or table base is a structural failure. Take it out of service until it is repaired or replaced.
- Press on wood: push your thumb firmly into any discolored or soft-looking wood. If it gives or feels spongy, rot has started. Sit-on surfaces with rot are not safe.
- Check sling tension: a sling that has gone slack in the middle or has significant tears is not safe to sit on. The fabric can give way suddenly under a person's full weight.
- Inspect glass tabletops: look for chips at the edges, cracks across the surface, or chips around the mounting holes. Tempered glass with a crack must come off immediately.
Anything that fails the triage above goes out of use. Tag it, lean it against a wall, or flip it upside down so guests do not accidentally use it while you plan the repair.
Repairs by material: what actually works
Teak and hardwood
Weathered teak turns a silver-gray that some people love and others hate. If you want to restore the warm honey color, start with a good cleaning using a dedicated teak cleaner, then hit it with 180-grit sandpaper going with the grain. Do not go coarser than 150 unless you are dealing with a genuinely rough surface, because coarser grits leave scratches that show through any finish you apply. After sanding, use a teak brightener to neutralize discoloration and open up the wood grain before finishing. A teak-specific maintenance guide also recommends the brightener step after cleaning and describes a “wood brightener plus wood oil” workflow use a teak brightener. Most teak brighteners are oxalic-acid-based, which is why they work so well on tannin stains and black mold streaks. Rinse thoroughly and let it dry for at least 24 hours before any oil or sealant goes on.
For the finishing step, there is real debate about teak oil. Some brands and restoration guides specifically advise against certain teak oil products because they can attract mold or degrade faster than alternatives. For most outdoor teak, a penetrating teak sealer or a high-quality tung oil blend will outlast cheaper teak oils significantly. If you are dealing with teak furniture from a known quality manufacturer, check the brand's own recommendations before applying anything, since some finishes can void any existing care guidance.
For other hardwoods like eucalyptus or acacia, the same sanding and brightening approach applies, but these species are more porous and will need more frequent oiling. Plan for two to three times per year in hot, dry, or very sunny climates versus once per year in mild climates.
Aluminum
Aluminum does not rust, but it does oxidize, which shows up as a chalky white or dull gray haze on the surface. Scratched or chipped powder coat can also look like rust bubbling, but it is actually the aluminum oxidizing underneath the damaged coating. Clean the surface with a mild degreaser, sand lightly with 220-grit wet/dry paper to knock back the oxidation and rough up the area around any chips, then apply a self-etching primer specifically designed for aluminum before topcoating. Using standard spray paint without primer on aluminum is the most common mistake and the fastest way to have your repair peel again within one season. For whole-chair refinishing, a rattle-can spray designed for metal furniture works well. For larger pieces, aerosol is fine as long as you apply thin coats and let each one dry fully.
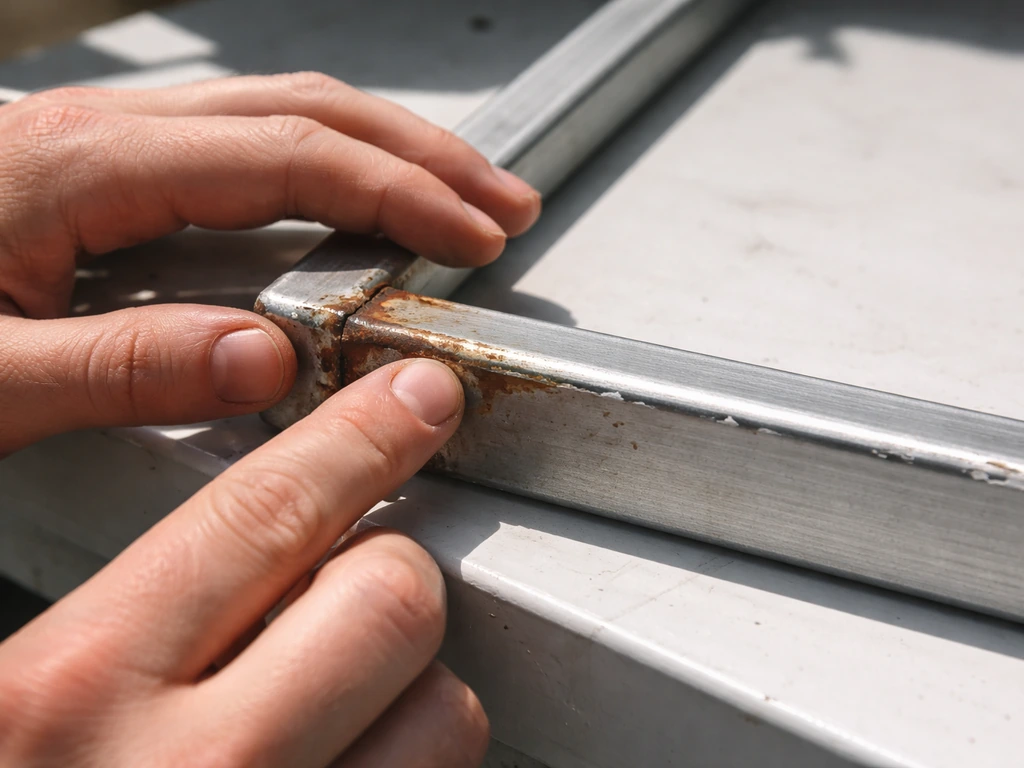
Cast iron and wrought iron
Cast iron and wrought iron furniture (common in vintage and antique pieces, sometimes found under brand names worth identifying and preserving) rusts from the outside in. If you are working with wrought iron specifically, focus on visual cues and common metal characteristics before choosing a rust removal and refinishing approach wrought iron furniture. Surface rust that has not penetrated deeply is completely manageable. Use a wire brush or angle grinder with a wire wheel to remove loose rust, then treat bare metal with a rust converter product, which chemically neutralizes rust and forms a primer layer. Let that cure fully (usually 24 hours), then apply a rust-inhibiting primer and a topcoat rated for outdoor metal use. Oil-based enamel paints give the most durable finish on iron. If you are dealing with significant corrosion on a piece worth keeping, electrolytic rust removal (soaking in a baking soda solution with a battery charger) is extremely effective but requires some setup.
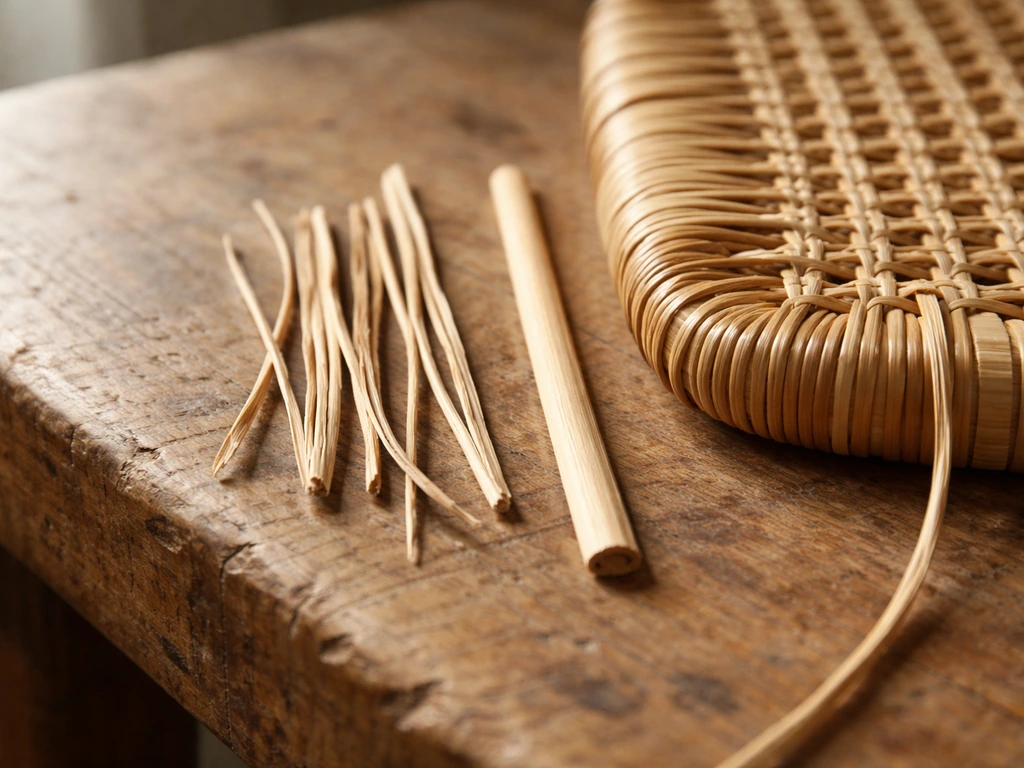
Wicker and rattan
Natural rattan and wicker need humidity to stay flexible and will crack in very dry or very hot conditions. If you have a few broken strands, you can repair them with rattan reed or cane purchased by the coil from craft or furniture supply stores. Soak the new material in water for 20 to 30 minutes before weaving so it is pliable. The tricky part is matching the weave pattern, so take clear photos of the intact areas before you start. Use a strong water-based adhesive at the ends to secure the repair. Natural wicker should be kept out of direct rain and should not stay wet for extended periods, which is why so many pieces degrade faster than owners expect.
Synthetic resin wicker is a different story. It handles rain and UV better, but once strands break, they tend to unravel from a section. Small breaks can be glued with a flexible outdoor-rated adhesive. Larger sections may need professional re-weaving or replacement of the wicker wrap on the frame. Since the frame is usually aluminum, the frame itself is rarely the problem.
Hardware and castors
Stiff, squeaking, or seized hardware is usually a lubrication and corrosion issue. Clean the hardware with a rust penetrant like PB Blaster or WD-40 Specialist, work the mechanism repeatedly, then apply a dry PTFE lubricant (rather than an oil-based one, which attracts dust and grime outdoors). If bolts are stripped or cast hardware is cracked, source replacements from furniture hardware suppliers rather than general hardware stores, since outdoor furniture often uses metric sizing and specific head profiles. Worn or broken castors can almost always be replaced if you measure the stem diameter and stem length correctly before ordering.
Fixing frames and structural issues
Loose joints
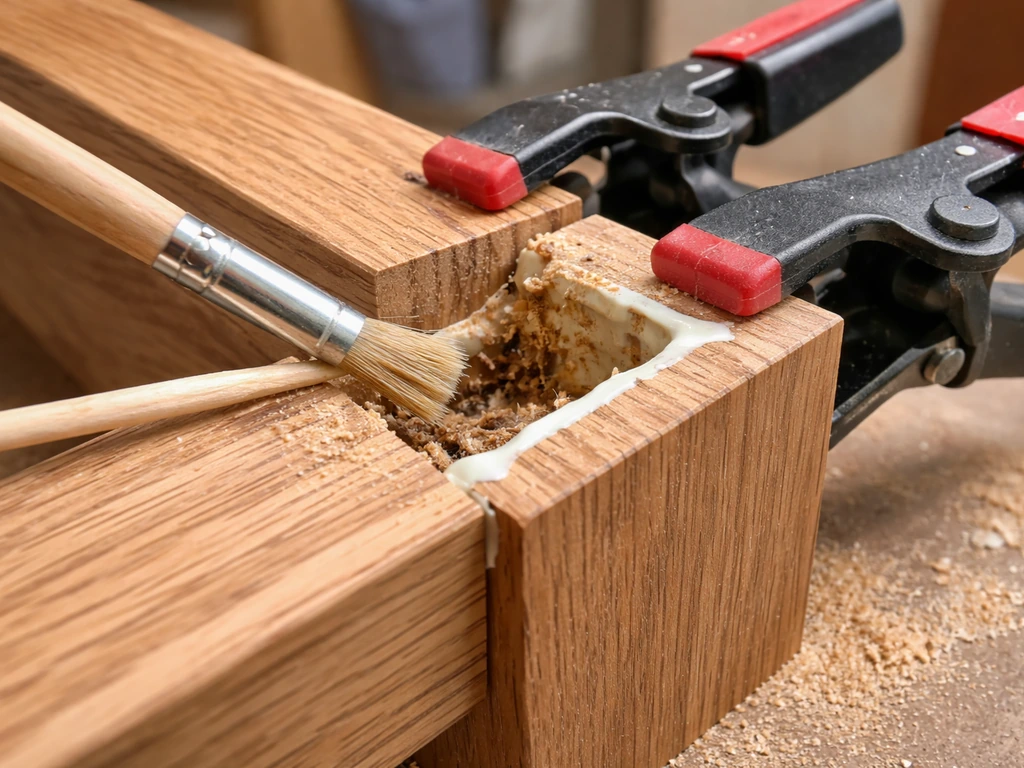
Loose joints on wood furniture are typically caused by dried-out or failed glue, and sometimes by stripped screw holes. If the joint can be disassembled, clean out all old glue with a chisel and sandpaper, apply fresh exterior-grade wood glue (Titebond III is a strong choice for outdoor pieces), clamp the joint firmly, and let it cure for a full 24 hours. If the screw holes are stripped, fill them with wood glue and toothpicks or a wood plug, let that cure, then re-drill. On metal furniture, loose joints usually mean a bolt has loosened or a mechanical connection has worn. Tighten all bolts with the correct tool rather than pliers to avoid rounding heads, and add a thread-locking compound to prevent them from working loose again.
Broken slats
Broken slats on wood furniture are one of the more satisfying repairs because the fix is almost always straightforward. If you can source matching lumber (teak, eucalyptus, or whatever species the piece uses), cut a replacement slat to match the original dimensions exactly. Sand it to match the finish of the surrounding slats, apply your finish of choice before installation so all six sides are protected, then attach it with stainless steel screws rather than standard zinc-plated ones to avoid rust streaking on the wood.
Rusted structural members
When rust is deep enough to pit the surface of a structural tube or leg, you need to assess whether the metal has thinned to the point where it cannot hold load. Press firmly on the rusted area. If it flexes noticeably or feels thin, the structural integrity is compromised and the piece is not safe to use. If the metal feels solid despite surface pitting, wire-brush the rust thoroughly, apply rust converter, prime, and paint as described above. Then keep a close eye on it each season.
Broken welds
A broken weld on an aluminum frame is not a DIY repair unless you have a TIG welding setup and experience with aluminum, which is much less forgiving than steel welding. For steel or iron frames, a local welding shop can fix a broken joint for $40 to $150 depending on complexity and your market, which is almost always worth it on a quality piece. If you are dealing with vintage furniture worth restoring (wrought iron designs, for instance), a proper weld repair followed by refinishing can bring the piece back to near-original structural strength. This is where knowing the origin of your furniture matters; quality vintage frames are typically worth the repair cost.
Refinishing and protecting the finish
Wood and teak finishing
After sanding and brightening (as covered above), choose your finish based on how much maintenance you are willing to do each year. Penetrating oils need to be reapplied more frequently (typically once or twice per year) but are easy to touch up and give a natural look. Film-forming sealers and varnishes last longer between applications but require more prep work when they eventually fail. For teak specifically, the brightener-and-oil approach is the most widely recommended workflow: it removes oxidation, opens the grain, and lets the oil penetrate rather than sitting on the surface. A similar brightener-and-oil routine for outdoor teak helps prevent the need for aggressive refinishing as often, with maintenance sanding called out in many teak-care guides.
Metal finishing and rust prevention
The sequence for metal finishing is always: bare metal, rust converter (on iron/steel), primer, topcoat. Skipping any step shortens the life of your repair dramatically. For aluminum, use self-etching primer. For iron and steel, use a rust-inhibiting primer. Topcoats should be rated for direct sun and rain. In coastal environments with salt air, the topcoat matters even more: look for marine-grade paints or coatings designed for high-humidity salt exposure, and plan to inspect and touch up annually.
UV and water protection
UV is what degrades most outdoor finishes fastest, followed by standing water. For wood, a UV-inhibiting sealer applied after oil or stain dramatically extends the time between major refinishing jobs. For metal, light-colored or glossy paint reflects UV better than dark matte colors. For synthetic wicker, there is no good field treatment once the resin starts UV-degrading; prevention through furniture covers and seasonal storage is the only effective strategy.
Cushions, straps, and textiles
Cushion recovery vs. replacement
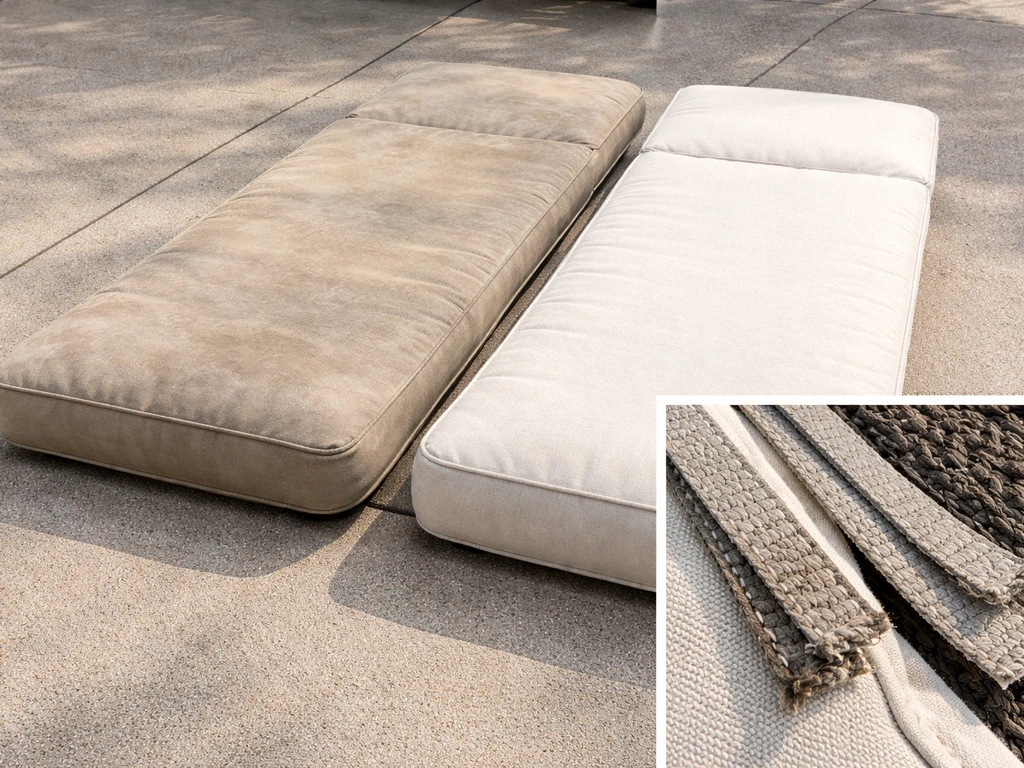
If your cushion foam is still in good shape but the fabric is faded or stained, recovering is almost always the better value. Outdoor fabric (Sunbrella is the most commonly recommended brand) is sold by the yard and is easy to work with using a home sewing machine. Bring a cushion to the fabric store to compare color and thickness before cutting. If the foam itself has compressed or broken down (it will feel uneven or flat in areas), replace the foam at the same time since you are already pulling the cover. Outdoor cushion foam is rated for water resistance; do not substitute standard upholstery foam, which holds moisture and breeds mold.
Sling chair repair
Sling chairs use a fabric panel stretched between frame rails, held in place by a plastic spline pressed into a channel on each side. When the sling goes slack, tears, or the fabric becomes brittle from UV, the sling panel needs to be replaced entirely. The critical measurement before ordering is the spline size: common sizes are 3/16 inch, 7/32 inch, and 1/4 inch, and the right size depends on the specific channel cut into your frame. If you need step-by-step fdw patio furniture instructions, follow the same measurement-first approach and double-check the spline size before you install the new panel order the replacement sling fabric. Measure the spline size carefully before ordering, because sling chair parts are specific and the wrong fit can leave your repair insecure The critical measurement before ordering is the spline size. Do not guess or assume a standard size exists. Remove the old spline, measure it with calipers, and order the replacement sling and spline in that exact size. Replacement sling fabric is sold by multiple online suppliers and can be custom-cut to your exact frame width and seat length.
Straps and webbing
Woven strap chairs (the flat vinyl or polypropylene straps woven through a metal frame) can be re-strapped at home with a strap kit. Kits are sold by size and color and include the straps, clips, and basic instructions. You stretch each strap under tension and clip it in place. It is time-consuming but not technically difficult, and the result looks as good as new. The main mistake is not stretching the straps firmly enough before clipping, which leaves them sagging within one season.
Maintenance and prevention for long-lasting furniture
Most of the repair work described above is avoidable with a consistent, simple maintenance routine. The effort required to maintain outdoor furniture is far less than most people expect, and it compounds over time: furniture that gets annual attention rarely needs major structural repair.
- Clean all furniture at the start and end of the outdoor season with a mild soap and water rinse. Avoid pressure washers on wood at close range (under 12 inches), which can raise the grain and damage finishes.
- Apply fresh oil or sealant to wood furniture at least once per year, and twice per year in hot, sunny, or coastal climates. Do this in spring before heavy use and in fall before storage.
- Inspect all metal joints, bolts, and welds each spring. Tighten loose bolts, touch up any paint chips before rust starts, and treat any new rust spots immediately.
- Store cushions indoors during extended rain or when temperatures drop below freezing. Even the best outdoor fabric lasts significantly longer when stored during the off-season.
- Use furniture covers during the off-season and during extended periods of non-use. Covers do not need to be expensive; they just need to block UV and shed water.
- Lift furniture when moving it rather than dragging it. Dragging bends legs, cracks joints, and damages feet, which are often the first structural failure point.
- Apply a silicone-based lubricant to all moving parts (folding joints, rocking mechanisms, swivel bases) once per year to prevent seizing.
- In coastal environments, rinse furniture monthly with fresh water to remove salt accumulation, which accelerates metal corrosion and fabric degradation significantly.
Repair vs. replace: cost, durability, and when to bring in a pro
Not everything is worth repairing. The question to ask is whether the repair cost (your time plus materials, or a pro's labor) is less than what a comparable quality replacement would cost, and whether the repaired piece will last a meaningful number of additional years. For furniture from quality manufacturers, the answer is usually yes. If you are shopping for patio furniture from Allen and Roth, focus on the specific materials and build quality so you can judge whether repairs will be straightforward Allen and Roth patio furniture. For low-end furniture with structural failures, the answer is usually no.
| Situation | Repair Worth It? | Recommended Action |
|---|---|---|
| Surface rust on quality iron frame | Yes | DIY rust treatment and repaint |
| Broken weld on quality steel or iron frame | Yes | Hire a local welder, then refinish |
| Rotted wood on a quality hardwood chair | Sometimes | Assess depth; replace slat or full piece |
| Cracked weld on cheap steel frame | Rarely | Replace the piece |
| Faded teak or hardwood | Yes | Sand, brighten, oil or seal yourself |
| Torn sling on aluminum sling chair | Yes | Order replacement sling and DIY re-sling |
| Broken synthetic wicker strands (few) | Yes | Flexible adhesive or professional re-weave |
| Severely UV-degraded synthetic wicker (widespread) | Rarely | Replace the piece |
| Loose joints on quality wood furniture | Yes | Re-glue and clamp |
| Bent or cracked aluminum frame tube | No | Replace the piece or the frame component |
A professional furniture repair service is worth calling when a weld needs fixing, when structural wood joinery is beyond your skill level, or when you have a genuinely valuable vintage piece (an original Woodard wrought iron design, for example) where an improper DIY repair could reduce its value or structural integrity. Professional patio furniture repair shops can also re-sling, re-strap, and re-weave at scale, often at a per-piece price that beats the time cost of doing it yourself. Professional patio furniture repair shops can also help you choose replacements when a garden treasure piece is beyond a simple fix who makes garden treasures patio furniture. If you are trying to identify Halmuz patio furniture parts or care instructions, start by figuring out who makes Halmuz patio furniture and what model line you have. If your piece needs more than basic DIY work, patio furniture repair pros can handle repairs like re-welding, re-finishing, and sling or wicker replacement. If you are unsure whether your piece warrants professional attention, that decision comes down to knowing what it is worth and what replacement would actually cost you.
For most repairs, though, the path forward is the same: identify the material, diagnose the actual failure, source the right products, and work through the repair in the right order. Quality furniture is built to last decades when it is maintained, and most of what looks like end-of-life damage is actually just deferred maintenance. Start with the triage checklist, take the damaged piece out of service if there is any structural concern, and then work through the repair steps for your specific material. The upfront effort is nearly always smaller than the cost of replacement.
FAQ
How do I tell if a “worn” spot on teak is just finish fade or deeper damage I should not DIY?
Run a fingernail across the area and look for roughness you can feel. If the surface is uniformly silvery-gray but smooth, it’s usually oxidation and can be cleaned, brightened, and sanded lightly. If you see soft, dark patches, flaking, or deep scratches that catch the nail, stop and reassess because you may be dealing with bruised wood or underlying rot that sanding cannot fix reliably.
What’s the safest way to test paint or finish compatibility before refinishing patio furniture?
Choose an inconspicuous area and do a small abrasion test (for example, a quick rub with fine sandpaper). If the coating smears or gums up, it may be a soft or unknown finish. Then do a chemical spot test only if you understand the product used originally. When compatibility is uncertain, strip back to bare material rather than layering new coatings on top.
Do I need to sand aluminum powder coat before repainting?
Yes, at least lightly. The guide’s approach (degrease, knock back oxidation, and roughen around chips) is important because new topcoat needs a mechanical grip. If you only clean and then paint over a glossy powder coat without scuffing, peeling within a season is much more likely.
How can I avoid “rust-through” on cast iron or wrought iron after repairs?
Stop the job if rust pits are deep enough that metal feels thin or flexes under firm pressure. If it’s safe to repair, use the full sequence (rust remover or converter, rust-inhibiting primer, then an outdoor-rated topcoat). Skipping the primer or using an indoor enamel often leads to premature failure in wet seasons.
Is it okay to use oil instead of a sealer on iron or steel furniture?
Usually no. Oil can help with temporary surface protection, but on iron and steel it tends to wash out, attract grime, and accelerate coating breakdown outdoors. For long life, use a rust-inhibiting primer and a properly outdoor-rated topcoat over clean, converted metal.
What’s the difference between repairing natural wicker vs synthetic resin wicker in practice?
Natural wicker repairs depend on humidity behavior and typically need strand replacement plus protection from prolonged wetting. Synthetic resin wicker is more weather resistant, but breaks often unravel from a section, so field gluing is best for small strand breaks, while larger failures often require professional re-weaving or a replacement wrap.
When I re-glue wicker ends, how do I prevent the repair from peeling later?
Let the old area fully dry, then roughen the contact surfaces slightly (without weakening the strands) so adhesive has grip. Use a flexible outdoor-rated water-based adhesive for ends, and clamp or tape long enough for full cure. Also avoid using the chair until cure is complete, not just until it feels dry.
Can I reuse sling chair spline if it looks okay?
Don’t assume it’s reusable. If the old spline is brittle, deformed, or the channel looks widened from years of tension, reuse can lead to a loose, insecure fit. The repair quality often depends on spline condition, not just the fabric panel measurement.
How do I accurately measure sling spline size so the new panel is secure?
Remove the old spline and measure it directly with calipers, not a visual guess. Measure the thickness (and if your spline has a distinctive profile, note its shape as well). Then match the replacement spline and order the sling fabric based on the frame width and seat length so tension is even.
What should I do if sling fabric fits but the chair still feels slack after install?
Re-check that the spline is fully seated in the channel on both sides and that the panel is the correct width for your specific frame cut. If one side sits differently, the chair will sag. It’s often a spline seating or sizing issue rather than the fabric being wrong.
How do I choose between re-finishing and replacing wood slats when they’re broken?
If you can source matching lumber of the same species and thickness, and the surrounding slats are sound, replacement slats are straightforward and usually best. If multiple slats show widespread staining plus soft spots, the underlying frame and supports may be failing too, so it’s smarter to inspect joints and consider professional assessment.
What’s the best way to fix loose wood joints without making a mess of the surrounding finish?
Disassemble if possible, then clean old glue thoroughly (chisel and light sanding) and protect nearby finished surfaces with masking. Use exterior-grade wood glue and clamp firmly. Let the cure complete for at least a full day before reassembly or use, because rushing is a common reason joints loosen again.
How do I know when rust on a structural metal tube or leg is too deep to repair?
Use the “press test” logic from the guide. If the rusted zone flexes noticeably, feels thin, or you can see scaling that suggests significant metal loss, the piece is not safe to load. If it feels solid, you can proceed with wire brushing, rust converter, primer, and an outdoor topcoat.
Why did my outdoor coating peel soon after aluminum repainting?
The most common causes are skipping self-etching primer, failing to roughen or fully degrease, or painting too thick and trapping moisture or contaminants. Stick to thin coats with full dry time, and make sure the area is clean and properly prepared before primer goes on.
Is weekly cleaning enough to prevent most repairs, or do I need seasonal maintenance too?
Weekly wiping helps with dirt and salts, but seasonal maintenance is what prevents buildup that breaks coatings and corrodes hardware. A practical approach is to clean and inspect at the start of the patio season and again near the end, then touch up small coating chips before they expand.
What hardware replacement mistakes should I avoid on patio furniture?
Measure stem diameter and stem length for castors before ordering, because they’re often not standardized across brands. For bolts and connectors, use the correct tool type to avoid rounding heads and order replacements that match the furniture’s thread and head profile, not generic store hardware.
When is it worth calling a pro for quality interiors and patio furniture repair instead of DIY?
Call a pro when the failure is structural (broken aluminum welds without TIG setup, cracked joinery beyond your comfort, or hidden rust that suggests frame thinning), or when the item is valuable or vintage enough that cosmetic mistakes would reduce its resale or historical value. If the repair cost is close to replacement cost but you’d lose time and risk safety, professional service is often the better decision.
How do I estimate whether a repair will last “enough years” before I start buying supplies?
Compare the cost of materials plus your time against a comparable replacement and then ask how your environment will stress the piece. If you live in salt air or get intense sun, plan for more frequent topcoat or maintenance, and treat “one-season durability” coatings as a warning sign. A repair plan that includes proper primer and an outdoor-rated topcoat usually provides the longest return.
Next Articles
How to Identify Vintage Woodard Patio Furniture
Step-by-step checklist to verify vintage Woodard patio sets using stamps, design cues, materials, and maker marks.
Is Teak Patio Furniture Good? Durable, Smart Buying Guide
Is teak patio furniture good? Evidence-based verdict, lifespan, care, buying tips, comparisons, and eco guidance.
How Long Does Teak Patio Furniture Last? Lifespan Guide
Teak patio lifespan ranges, factors that shorten or extend durability, and a maintenance plan to protect joints and fini